What are the differences between Hamilton Beach 29882 vs 29885? Which Hamilton Beach bread maker should you pick? We’ll help you answer those questions in this review by comparing and contrasting the Hamilton Beach 29882 and the Hamilton Beach 29885 bread makers.


There’s nothing better than freshly baked bread, fresh out of the oven. It’s best when it’s still hot in your hands, and the taste is still flavorsome. However, this is rarely seen in modern households, whether it’s the lack of old ovens or the time to prepare the dough and bake. Luckily for some, the bread-making machines are here to save the day.
You can easily join the craze about artisan bread or handmade loaf that you created. With a bread machine, you will make something with only a few steps that involve turning on the maker and putting in the ingredients. The machine will do everything else. Without a doubt, these products are a godsend. But how do you know which one to choose?
Well, thanks to Hamilton Beach, the choice is narrowed to Hamilton Beach 29882 and 29885. This review will help you choose between two of their models, both fantastic for your kitchen.
| Hamilton Beach 29882 | Hamilton Beach 29885 | |
| Image |  |
 |
| Dimensions | 10.43 x 14.13 x 12.2 inches | 16 x 10 x 10 inches |
| Item Weight | 11.86 pounds | 10 pounds |
| Baking Functions | 12 | 14 |
| Loaf Sizes | 2 | 3 |
| Crust Settings | 3 | 3 |
| Delay Timer | Yes, 13-hour delay | Yes, 15-hour delay |
| Accessories | Yes | Yes |
| Recipe Book | Included | Included |
| Price | Check Price on Amazon | Check Price on Amazon |

Hamilton Beach 29882 vs. 29885 – Similarities

Crust Settings
Hamilton Beach Bread Makers have many features. One of those features is choosing what type of bread crust you want on your bread. Both the Hamilton Beach 29882 and 29885 have three options. You can choose between light, medium, or dark crust. Of course, this will depend on your personal preferences and the type of bread you will be making.
Accessories
What’s great about the Hamilton Beach products is the fact that they come with extra accessories. With both of these models of bread machine, you will get a spare kneading paddle. You can use one while the other is in the dishwasher. Plus, you might receive a measuring cup and spoon and a paddle removing tool. If not, then you can buy these accessories and many others from Hamilton Beach.
Recipe Book
Another amazing gift is the recipe book. Both the 29882 and the Hamilton Beach 29885 come with a book of recipes and baking tips. In case you are a beginner, this will help you with the learning part and guide you through the bread-making process. In this recipe book, you will find both whole-grain and gluten-free recipes.
Differences between Hamilton Beach 29882 vs. 29885 Bread Makers
Design
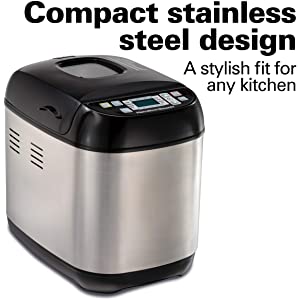
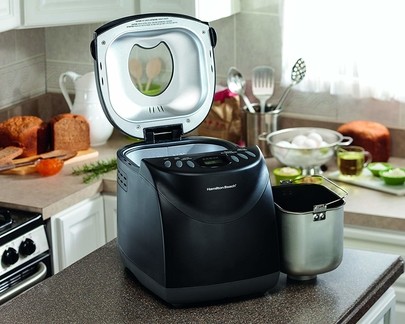
A difference immediately visible is the design, or look, of the Hamilton Beach 29882 vs. 29885. The former comes with a simple design with plastic on the outside. The color is black. On the other hand, the latter model has a stainless steel exterior, which some might find more appealing. Nonetheless, their design doesn’t affect how they perform.

Loaf Size
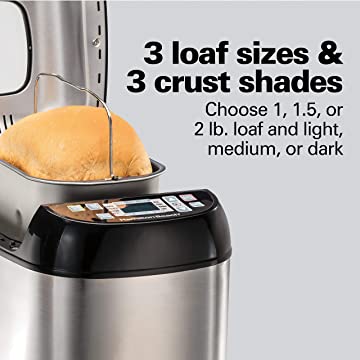
Another difference between model 29882 and model 29885 is the size of the loaf you’d like to make. With the Hamilton Beach 29882 bread maker, you can choose between two sizes–a 1.5 pound and 2-pound loaf. Contrary to that, the 29885 bread maker has one size more–a 1 pound loaf in addition to the 1.5 and 2 pounds.

Baking Functions
Moving on, we come to the most exciting aspect of these products, and those are the baking possibilities. Yes, both have many options, yet the Hamilton Beach 29885 has a bit more–14 to be exact, compared to the Hamilton Beach 20882, which has 12 options. Some of them include French, gluten-free, quick bread, cake, dough, artisan, whole-grain, and sweet. There’s plenty more, but that’s for you to discover.
Delay Timer

Preparing with these bread makers is easy since you can do it in a short amount of time, plus you can prepare the ingredients and postpone the baking for a later time. What makes this possible is the delay timer that both of these items have. It’s perfect if you want to wake up to freshly baked bread. However, the difference is in the amount of delay you get with each model. The 29882 has a 13-hour delay option, while the 29885 gives you a 15-hour delay. Not much of a difference, but a difference nonetheless.
Also read: Bread Machine Comparison: Hamilton Beach 29881 vs 29882
Value for Money
What makes these Hamilton Beach bread makers fantastic is the balance between affordability and functionality. In the end, you will buy a lot both in terms of features and the sheer easy-of-use of these products. You could make bread every day with little to no fuss.
Hamilton Beach 29882
In all honesty, each bread machine is a great value. The 20882 model will provide you with all the basics you need. Not only can you bake with it, but you can also create pizza dough. The only downside may be the fewer number of functions or the plastic exterior.
Hamilton Beach 29885
With this model, you won’t make a mistake. You will have 14 baking functions, plus various loaf and crust types. Moreover, the exterior looks fancier since it comes in stainless steel, which only adds to its value.
| Hamilton Beach 29882 | Hamilton Beach 29885 |
|
|
| Pros | Pros |
| It has a delay timer. | Longer delay timer, 15 hours. |
| 12 baking functions. | 14 baking functions. |
| 3 types of crust and loaf sizes. | |
| Cons | Cons |
| Not as many accessories included. | |
| Has a plastic exterior. | |
| Buy on Amazon | Buy on Amazon |
Which Hamilton Beach Bread Maker to Buy?
In the end, the conclusion is that both of these bread making machines are fantastic additions to any kitchen. Nevertheless, Hamilton Beach 29885 will be the winner of this comparison because of the slightly more features than the 29882 model. Plus, there are really no downsides to it, no cons. You have 14 options that range from baking regular bread to making sweets to preparing pizza dough. Additionally, you can play around and customize your bread loaf. All in all, it’s a perfect machine.
The winner of comparison is Hamilton Beach 29885
Related Comparisons:
- Zojirushi Virtuoso Plus vs Supreme – Which Breadmaker is Better?
- Oster Expressbake vs Cuisinart CBK-110 – Which Bread Maker to Choose?
- Difference between Cuisinart CBK 100 vs CBK 200
- Cuisinart SS 10P1 vs Keurig K Select
FAQ
Where are Hamilton Beach 29882 and Hamilton Beach 29885 made?
Are the Hamilton Beach bread makers loud?
Which Hamilton Beach bread maker models are on the market?
Related Comparisons
Hamilton Beach 29881 vs 29882/
Zojirushi Virtuoso Plus vs Supreme/
Oster Expressbake vs Cuisinart CBK 110/
Manufacturer:

Two Owners of a Hamilton Beach Bread Machine Spout Off
Peter D – Bellmore, NY
Hey everybody, it’s your boy PD smooth about to make some homemade bread in the Hamilton Beach bread machine, two-pound bread maker, my third attempt. Let’s see how this works. I can’t wait for some fresh homemade bread! Take this and go put in the ingredients. Alright, we’re going to be starting with the wet ingredients first as you skim over making the 1.5 white low. One cup of room temperature water. Let me just put this in, I want everyone to see that I’m doing these measurements Correct. I’m going to put it here so the video can see that’s true. That is one cup. And one down video from the angle may look low.
Is that too low? Maybe it is. I’m going to put a little bit more just to be safe. water going in first. Alright, one cup of water going in. Like I said, wet ingredients are going first. Next wet ingredient. Three tablespoons of vegetable oil. That is not as easy to measure.
Let me get this thing out as the oil, that can fit this, but I’m gonna go like this.
That’s one. Hopefully the video sees that I’m making these correct because according to my wife, I do not follow the directions exactly. And that’s why my bread came out weird last time. All right, well, that’s three. Everyone sees it’s is clearly three tablespoons. Three tablespoons. Yes, vegetable. Our next we’re gonna go with, one tablespoon of sugar. Let me just make sure this thing is cleaned off. This is like, accurately.
This is why I have this big knife here. I’ll go ahead and make sure it’s one tablespoon. Just like the instructions say. It’s good. Going deeper. I try that again. I am really trying to make sure this is accurate. we’ll try it this way. All right, that looks like a tablespoon to me. Let’s throw that in the corner. Now we’re running salt. Water check, sugar check, oil check. Salt in one a teaspoon. What’s this 1/8? What is that mean? 1/8 tablespoons, you got a busy kitchen today, here is the one. That is my problem. I don’t know how you do things. Like that’s not full yet.
I guess I might lose some salt in this but it is what it is. No, that looks good. Look at that. That’s one that in the corner. Now. This could be this could be the breaking point because I only have a quarter. I wanted to do half of this thing. To do the eighth. Hopefully worst-case scenario is to have bread that’s a little salty or non-salty. That looks like about half. that’s I’m gonna call that the eighth. All right. Now for the flour, three and a half cups. Red flour. I guess this is change, last time I use all-purpose flour. I’m using red flour this time. Three and a half cups. Put in this bowl for easy scooping. Let’s see. that looks like a cup. Let’s say this is just kind of levelled off.
That’s one would everyone agree? It’s one I think so. One down two and a half to go. I think I need more in this bowl. All right, I’m going straight into the bag. Okay. That is two. I would like to put over here now to down what does that mean? One and a half to go. you’re going back in the bowl. see I’m working and I just am doing this because I need to get some feedback see if this spread does not come out to the perfection like it does on the commercial then I need feedback because I think I’m following these directions and that’s three.
Now I just needed to have come up next, there’s going to be evidence to my work that I follow the directions as stated three and a half cups of bread flour let’s do this last half of a cup half cup says all right. Shout out to the bread machine! That is three and a half now. Candy Girl Can you come over here I don’t know if you could see inside this because not to make to make this little dip in the for yeast. Like boom. hello to my little spark my yeast. Yeast because it says here No, it doesn’t matter three pack and it’s I work some bread machine. I’m going for aid. One and a half teaspoons. Says bread machine nice but this package did say it works on machines. Alright, here we go. I’m measuring out yeast here.
Let’s put that in the mill. Okay, the instructions say one and a half teaspoons. quarters have to do this twice. I couldn’t find the half teaspoon or this or the quarter. This package has worked to a quarter so I should have some leftover when I’m done. Because it is a quarter one more quarter and we get the yeast in. Alright, this is the last quarter. All the ingredients are in as her instructions. Now I’m going to carefully carry this to the machine.
I put this thing in at this little angle. I think I’m good at closing this 90 to go with a low size 1.5 cycle number one medium crust. Yeah, we’ll do a medium crust. Okay, and all I do is hit start a window and I’m going to come back to that see how this is going to be working because it’s supposed to be that easy. Thank you for the first segment. Alright, here we go. You get some gloves on open that bad boy up supposedly cold hot in there.
And you got to turn it to unlock it. Take it out. Looks like a pretty late crust. Can you see it? You know this thing goes on the cooling rack. Hang on one second. Alright, guys, we’re gonna cut this to see how it looks on the inside.
I’m not gonna wear gloves, maybe I do need a glove, because it’s a little hot.
This took three hours. After I push the button and start I did nothing else until we ended.
Look at that! It is amazing what this bread machine can do. I might slap some butter on this and eat it. As you can see it came away better than my last loaf. Come up way better than my last loaf, must show a picture of the last one right here. I don’t know what happened to that. But you bread flour this time and look at those results. Just follow the instructions.
Joan W – Bellingham, WA
Hi everybody. Well today I’m going to show you how to make a two-pound cinnamon loaf using the Hamilton Beach Bread machine. My bread machine came with a bread pan, two paddles and a recipe book. To do the two-pound loaf, you need the one bread pan and of course one paddle and your recipe. And this is the recipe here. If you want to learn how to make this bread, please stay tuned. If you like it, then next week I will show you my famous gooey cinnamon raisin buns.
Okay, I have a portion of my ingredients according to the recipe. Now if you are new to using the Hamilton Beach Bread machine, you must first put in your paddle before you do anything else. my first Petunia puddle. now before you bake the bread, you must do it in three steps right to come out properly. And according to the manual, the first step is that you must add all your liquids then you add your solids and the last step is to add the yeast. The first step we are going to do is add all of our liquids, so the recipe calls for one and a half cups of water. I have already portioned that out. I’m just going to add that now. One and a half cups of water we are doing all our liquids first. And then the other part of the recipe calls for three tablespoons of butter or vegetable oil.
I always make all my breads using healthy oils. In this case I have used canola oil I normally make the bread using canola oil or olive oil. In this case, I am using three tablespoons of Jays canola oil. And you add that there to liquids. Now the ingredient list will be added to the description box below. I will just say them and then you can look in the description link below to get the ingredient lists as to what to put in it. All right after you’ve added your liquids, our next step will be let me just move this out of the way. Your next step will now be adding all the solid ingredients.
Now one thing to note is that I get a smooth bread when I add them into corners of the pan. If you just mix them up, sometimes they mix up and don’t mix well. I portioned out everything and then I put them in the corners of the pan and then add the floor on the slats. The next thing on our list is two teaspoons of salt. Two teaspoons of salt I added to the corner. Right, two teaspoons of salt. And then we have a quarter cup of sugar. A quarter cup of sugar, I’m going to add that in the next corner there.
Then the recipe cause or two teaspoons of cinnamon. We have two teaspoons of cinnamon I’m going to put this in another corner and milk, two tablespoons of dry nonfat milk into the bread machine. One good thing is that I always use low fat milk. I tried to get things as healthy as much as possible. I put that so if you notice I’ve added them to the four corners you see it four corners in the pan right and now we are going to add the flour.
On my mixing bowls are in use, I have to use my ice cream bucket. Right we’re going to add the flour now. This is four cups of flour here. Of course, the 1.5-pound loaf is going to call for a different amount of flour. But this is a two-pound loaf that I’m making. It’s challenging to hold this and the camera at the same time. Right so that’s that. I did in the flower. And we have to put in the yeast last. So normally when you’re going to put in the yeast, the manual tells you to make a little hole in the center of the top of the flower. I’m going to do that now to the bread machine.
And making a little hole right here because the use is not supposed to come into contact with any of your liquids. I made the mound, you see the mound right there, you put to use of that amount in the bread machine.
Right basically that’s what you do when you come to your ingredients. Now going to take this over to the bread machine. give me one minute and then I’ll be right back.
One thing to note, when you’re using these bread machines, they wobble so you normally have to put it on a flat surface and put it in a little bit so that it gives it enough room for it to wiggle say wouldn’t fall off the counter and fall on the ground because you don’t want that happening, you could dent your bread pan. And I’ve now put the bread pan inside of the machine and show that when you put your bread pan in the machine that you lock it, then we lock it by normally turning it clockwise. now it’s locked so if you try to pull on it, it’s not going to come out and then you close down the lid then you close down the lid to make sure that it is sturdy enough. Next thing you do is the plug in your bread machine. I’m just going to plug this in right now.
When you plug it in a blue light will come on and on it you will see some instructions here. Now I want a medium crust. This is for cycle crust and low size. This cycle is going to tell you. Then you will see this cross button is the change in between light medium or dark. And the low size is the switch between 1.5 and 2 pounds. And for me I want a medium cross. My crust has already been adjusted to medium and I want a two-pound loaf from this bread pan. I have already pressed my loaf sizes two pounds. Because it is a sweet recipe, I have to change your cycle to cycle five. I’m just going to press this up on the bread machine.
Now as I change your cycle, you realize that the timing is here. This cinnamon loop is going to take 2 hours and 55 minutes to be completed. After I’ve pressed in the cycle and the time now I press the start stop button and it will start to work and the process will run. And from now until 2 hours and 55 minutes I will give you brief updates as to how it goes so please stay tuned.
An hour and some minutes have passed. And if you can see I don’t want to raise the counter up. But as you can see there is some condensation on the top of the oven and the bread pan. But the bread is on the inside and it is raising a while. Two hours have gone and two minutes. And as you can see that the door it and now this is one big brighter. It has blown up so much. We have two to three minutes ago. Keep it there. And it’s one-minute left for the bread and it will be almost completed. This is what it looks like.
It almost touches the top of the bread pan and bounce back down. And when it’s finished this is what you hear several beeps.
Now I am going to take it out and then I will show you guys what it looks like. The two panel of is now completed and this is how big it is. And this is what it looks like. Very happy that I decided to try this recipe, it came out really well from the bread machine. There is nothing like fresh baked bread! And I cut it and this is what it came up like that’s going to be me. Alright, thank you guys for watching. And I hope that this was helpful. Next week: gooey cinnamon raisin buns!